NOTE TO DISTRICTS THAT STARTED BUDGETARY ACCOUNTING ON JULY 1st - If you have not already done so, please provide your account representative with your vendor balances from January through June from your previous software. Once those balances have been imported, please follow the instructions below to produce your 1099 forms.
Notes:
- 1099 forms will be printed on plain paper.
- Copy A (red copy) of the 1099 (MISC & NEC) must be purchased by the district as it cannot be reproduced by Genesis.
1099 Forms:
We have worked with MGL Printing Solutions to make sure our 1099 forms align to their envelopes. Please note, this year the MISC form is 2-up and the NEC form is 3-up. Please be sure to purchase the correct envelopes accordingly. To view the flyers from MGL with the ordering details, please click on the attachments at the very bottom of this article.
NOTE - the NEC envelopes from MGL are designed to fit THEIR perforated stock. Using with 8.5 x 11 plain paper will require trimming the right edge so the paper fits in their envelopes.
1099 Box Settings:
Link to IRS document for 2025 1099 MISC - CLICK HERE
Link to IRS document for 2025 1099 NEC - CLICK HERE
The combination of 1099 Form Type MISC and Box 7 is no longer valid. 1099 MISC form must go with Box 3. For non-employee compensation you must use form 1099 NEC. No need to select a box for the 1099 NEC form - the system defaults to the only box this can go in on the 1099 NEC form. The system is programmed to warn you of all vendors with the invalid combination (screen shot below).

To make the corrections to the vendor settings you can either go into each vendor with the warning and change the 1099 settings to the appropriate designations, or use our new button to mass set them. Check off the box in the first column and then click on the "Set 1099 form/Box for Checked". Then complete the appropriate lines in the second screen shot below. It's a quick, easy way to mass-fix your vendor 1099 settings.


How to Process 1099 forms
1. Review Vendor Records – Financial > Vendors, Etc. > Vendors

- Using the search options provided on the screen above, you can search for vendors who should receive 1099 forms.
- Clicking the Edit button for a vendor will take you into the vendor information and allow you make any necessary adjustments.
- If you find a vendor is missing from your search that should be receiving a 1099, you can search for that particular vendor and click Edit to add the necessary 1099 settings.
- NOTE: remember to clear the Max # Results to make sure your search produces all vendors, not just the first 500.
- Vendor EIN or SSN must contain the dashes per the IRIS system:


- Additional tabs available while on the individual vendor's screen are shown in the top light green menu bar – Info, Payments and 1099
- Info tab – is the vendor information screen shown above
- Payments – displays all payments made to this vendor for this budget year
- To look up the calendar year’s payments, enter the year in the “Chk/Adv Issue Date Year” field and change the PO School Year drop-down to the blank spot.
- 1099 – provides the ability to print this vendor’s individual 1099 form. This is also the screen where the January through June data will be imported for new districts. NOTE: The amount does not populate on this screen until you do step 2 below.


2. Create 1099 Data - Financial > Vendors, Etc. > 1099s > Data
Click the Recreate 1099 Data for all vendors button. This will create a 1099 record for all vendors who are set up to receive one. Repeat in the Vendor Various section if you used Vendor Various this year.
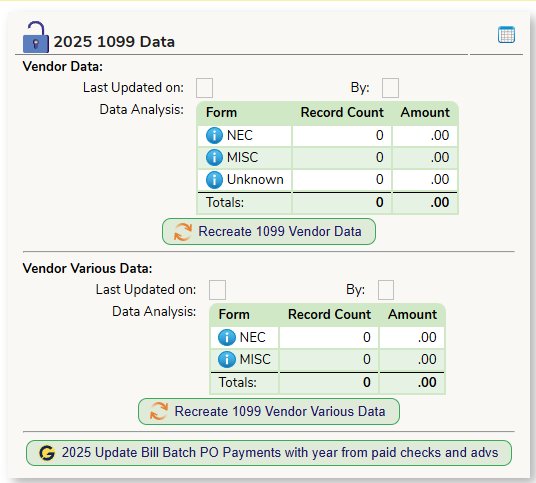
After creating the 1099 records, the Financial > Vendors, Etc. > 1099s screen will contain the following buttons.
- Recreate 1099 Data – creates the 1099 data and, if you make any adjustments or corrections to vendors, click this button to re-run the 1099 forms with the new/corrected data. Be sure to use the Delete button described below before using this button.
- Delete 1099 Vendor Data - click this button to remove all 1099 data from this screen. Use this if you have made any changes to vendor records. Deleting them and recreating them will bring in the new data.
- Download Vendor 1099 Vendors button – provides an Excel output of all the 1099 forms for your district. You can use this to review your data before you print the forms.
3. Print 1099 Forms - Financial > Vendors, Etc. > 1099s > PDF
To generate the forms for printing, click on the Download all 1099-MISC (Other Copies) and/or the Download all 1099-NEC (Other Copies) button(s). Print the forms.
To generate your Copy A forms, use the Download all 1099s-MISC (Copy A) button and/or the Download all 1099s-NEC (Copy A) button. Be sure to use the red Copy A form you purchased to print on.
If you need adjustments made on the alignment of any field, please enter a help ticket and include a copy of the form you printed so we can see what adjustments need to be made.

4. On the Financial > Vendors, Etc. > 1099s > PDF screen, the following buttons will take you to the documents and instructions published by the IRS as well as blank forms we created:

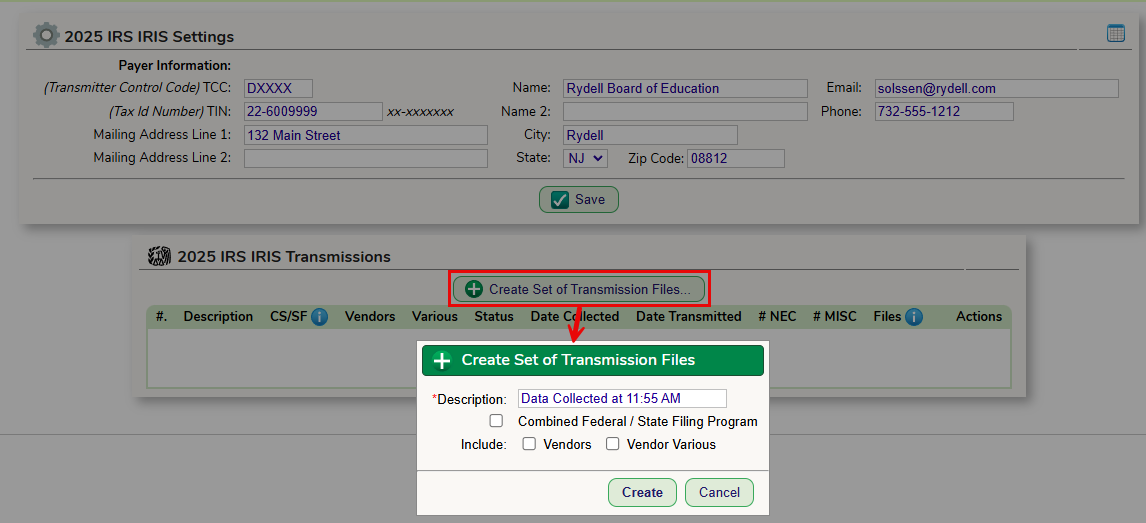
5. Create IRIS EFile - Financial > Vendors, Etc. > 1099s > IRIS
First, you must complete the first section (Settings) and click the Save button.
To create a file to send to the IRS via the IRIS system, click on the Create Set of Transmission Files button. Check off all necessary boxes, then click the Create button.
IMPORTANT NOTE: When you registered for your IRIS TCC number, if you chose to do combined filing for IRS and State be sure to check off the "Combined Federal / State Filing Program checkbox shown below.
After the file is generated, you will see the following data:

To download the NEC File, click the button and save it on your computer. You will use this file to send to the IRIS system.
To download the MISC File, click the button and save it on your computer. You will use this file to send to the IRIS system.
After the files have been successfully submitted and received by IRIS, click the Mark Submitted button.
If you need to make changes and regenerate the file, click on the Delete button to start over.
The count of forms can be found in the # NEC and # MISC columns on the transmission record.
6. New Jersey Filing - Per Publication 5717, pages 40 and 41 show that New Jersey is a participating state in the combined Federal and State filing system. There should not be a need to submit a separate file for New Jersey as long as you are choosing the Combined Federal / State Filing Program as shown in Step 5 above.
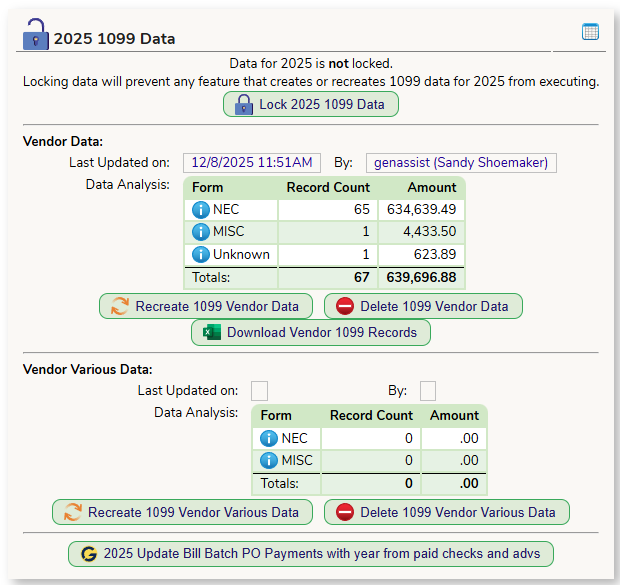
7. After you have completed your 1099 processing for the year, you can lock the records. Go to the Financial > Vendors, Etc. > 1099s > Data screen and click on the Lock YYYY 1099 Data button to lock the records. 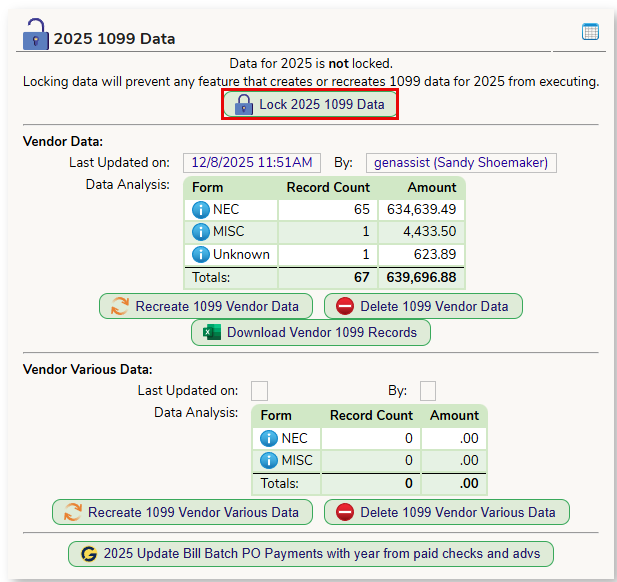
Was this article helpful?
That’s Great!
Thank you for your feedback
Sorry! We couldn't be helpful
Thank you for your feedback
Feedback sent
We appreciate your effort and will try to fix the article