Budgetary Accounting users can import a payroll purchase order for each payroll processed outside of the SchoolFi suite of products. For example, you use SchoolFi Budgetary Accounting, but process payroll in another software. An import template is attached to this article. The fields highlighted in yellow, with the exception of the Vendor Number, should not be changed. Once the Payroll Vendor number is set, that will not change throughout the year. Only the non-highlighted fields need to be updated for each and every import.

Instructions for completing the template
- Enter the PO number (column B) for all rows. The PO number Must be the same for each and every row.
- Enter the Description in C2 (recommended the date of the payroll being implored)
- Enter the PO date in D2 (recommended the date of the payroll)
- Enter the Ship To code in G2
- You will need a "CT" (charge to) row (rows 4 or 5 in the illustration above) for each and every expense account number. You CAN NOT have duplicate expense account numbers in your import. Each "CT" row will have the PO number (column B), the expense account number with dashes (column E) and the amount (column O). The unit price (column O) MUST be formatted as General in your excel file.
- Enter the total of all the "CT" unit price (or amounts) rows from Column O in cell O2. This must be a number and not a formula and it must be formatted as General in the excel file.
- Once the template is complete, you must save the excel as a Text (Tab delimited) file.
Instructions for importing the template
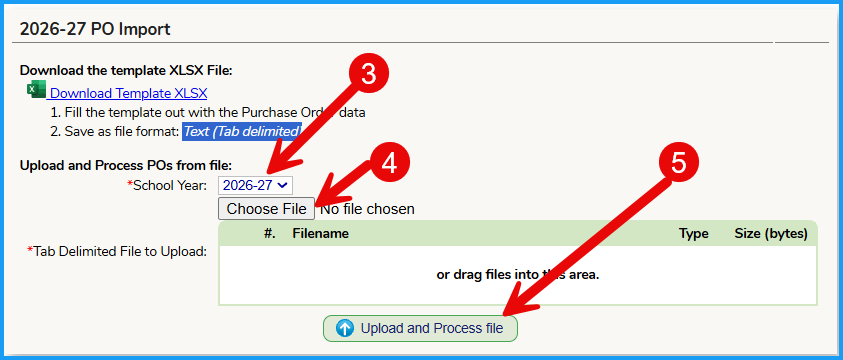
- Navigate to the Budget >> Expenditures >> Purchase Orders >> PO Import tab in SchoolFi
- Ensure you are in the proper school year (yellow bar - i.e. 2026-27)
- Ensure you select the proper school year in the window
- Click on the Choose File button and either drag-and-drop in the popup or fund the file on your computer
- Click on Upload and Process File
- The Purchase Order is imported in the filling form state. After you review the imported Purchase Order for completeness and accuracy, you will have to encumber it, and then post/print the Purchase Order.
"Paying" the Imported Purchase order
- Add the imported Purchase order to a batch
- Find the Purchase Order in the batch and click on the Payments button
- Click on the Add Payment to All Accounts button

- Click on the Toggle All No-Check Payments button and Save.

- Continue to process the payment as you would with all other checks.
Was this article helpful?
That’s Great!
Thank you for your feedback
Sorry! We couldn't be helpful
Thank you for your feedback
Feedback sent
We appreciate your effort and will try to fix the article