From the Budget > Revenues > Invoices > List screen, check off the Rollover Mode checkbox and click Search. This will put you in Rollover Mode and allow you to work with your invoices to set them for rollover. You can only rollover invoices in the Printed/Emailed or Partially Received status.

The first step is for the District to review all of the open invoices for completeness and accuracy. If an Invoice is no longer a true receivable, the balance should be canceled. Then, when you are ready to mark an invoice as ready for rollover, check off the invoice and click on the Set Checked for Rollover button.

Set the status to Ready to Rollover and click on the Set button.

You will see, the Rollover status is updated to reflect the status of the invoice.

When you are compete marking your invoices as Ready to Rollover, check off the invoices that you want to rollover and click on the Rollover Checked button. The Invoices will be rolled over to the succeeding year.

Once you roll over an invoice, you can not "roll it back" or modify it. You can only receive cash against the rolled over invoice or cancel the rolled over invoice.
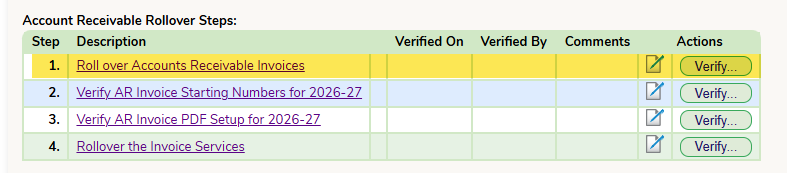
When complete ensure you sign off on the rollover tab:
Was this article helpful?
That’s Great!
Thank you for your feedback
Sorry! We couldn't be helpful
Thank you for your feedback
Feedback sent
We appreciate your effort and will try to fix the article