ATTENDANCE TAKEN WITHIN SCHOOLFI (Not Imported)
Setting up the New School Year
- If you did not copy your calendars, initialize and enter event codes for new school year on all calendars follow the steps below:
- Make sure you are in the year your system rolled into, you will need to click on “Edit” for the first calendar.
- Click on the “Initialize Calendar” button (If the button is not there, the calendar may already by initialized)
- Toggle to the next calendar and repeat same steps.

- Enter your Event Codes for the Year
- Go to Set up – Calendars, make sure you are in the future school year (green background).
- Click the “Edit” button for the first calendar you want to update (I recommend selecting a 12-month calendar).
- In the “Maintenance Action” notecard click on the “Manage Calendar” button.
- The screen will populate to the first month of the calendar you selected. Click on the date of your first event.
- Business Day: Uncheck if calendar is off and no attendance will be taken.
- Event: Select the event code for that day. These are managed on the Setup – Calendars – Event Codes screen.
- Override Value: Select value of day (leave blank if = 1).
- Description: If you want to elaborate on what the day is. Otherwise, the Event Code will be the only item displayed.
- Perform change for_days: Enter how many days you want to apply to after the date you selected (used for breaks).
- Only perform change for Business Days: This will skip over weekends if using the above option.
- Select the other calendars this event will apply too (This will prevent you from having to go into each individual calendar to apply to the same event)
- Keep in mind when you are adding Holidays (such as Summer Holidays), only apply the event to 12-month calendars. If you try to add an event on a date that does not exist within the calendar you will receive an error message.

Spot Check Starting Balances
- There is several Balance Check Reports you can run to verify your staff’s starting balances.
- The most used report is “Attendance Balance as of Date.”
- *Optional* If you are a frontline user, you can use this report to import your starting balances into frontline.
- The most used report is “Attendance Balance as of Date.”
- If you need to manually update a staff member’s starting balance(s) go to Personnel – Staff – Search Staff, search for the staff member and select “Edit” on their name.
- Toggle to their Attendance – Balances screen. you can edit the balance in the “Original” column and save before moving onto the next staff.
- If there is an error with an entire calendar or group of staff, in your summer rollover ticket let the help desk know the calendar, the balance code, and what the total should be. We will look at your rules set up, update, and reapply the rules.
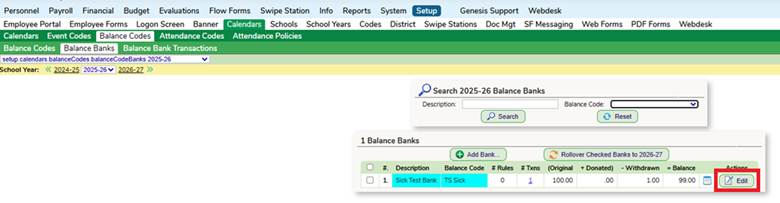
Setting up Balance Banks
- In the new school year, make sure your Balance Bank (if being utilized) is set with the correct initial/original days if any, and has all the proper “Staff Access Rules”.
Inactive Staff
- To stop inactive staff members from receiving calendars after they have left (or if they are retiring in the current year and received a calendar during rollover for the next school year) , you will search for the staff member, go to their Attendance – Calendars screen, – click on the “Remove Calendar” button for the year they are no longer in the district (Leave prior year calendars alone).

Was this article helpful?
That’s Great!
Thank you for your feedback
Sorry! We couldn't be helpful
Thank you for your feedback
Feedback sent
We appreciate your effort and will try to fix the article