NOTE: This report is subject to changed based on the Staff Vacancy Date Handbook
When selecting the "Create Snapshot" button the system will pull in all positions that are Contractual and have a Location field in the position code that have job codes 1000-3000, 3120 or 3105. The snapshot will always create a file as of the day it was ran.
If the district opts to not include 3120 and 3105 within the snapshot this can be managed on the Personnel - Setup - Jobs - Setup screen.

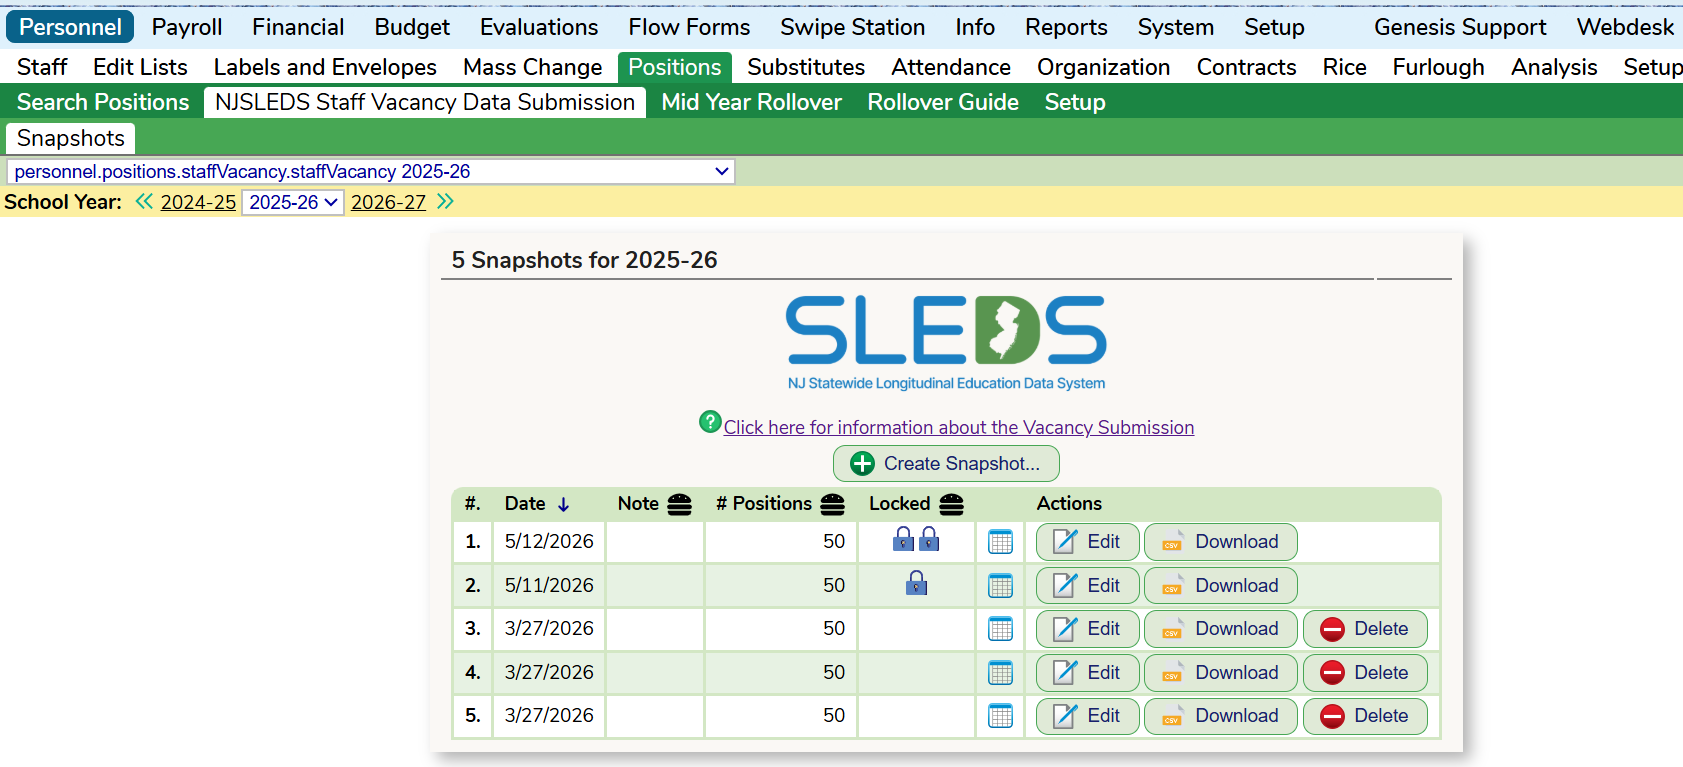
- Add a Note about the snapshot
- Download the submission file that you will then upload to the state
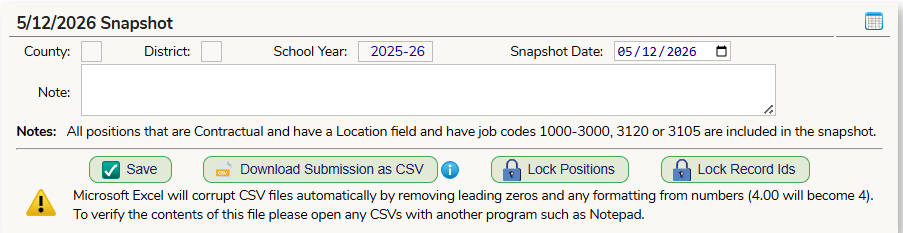
- Lock Positions - If you are manually overriding the position data within the snapshot, you will want to lock the positions, they can be unlocked to make additional changes as needed.
- Lock Record IDs - When you receive the IDs from the state, submit a ticket and we will import them into the snapshot. At that point they will be locked until you need to unlock them for any updates.

For any changes that need to be made, there are two options:
1. Update the main position code and create a new snapshot. Once the data is locked into the position record, it will carry through each snapshot you run. As you make changes to the positions, the snapshot will not show the updates until a new snapshot is created.
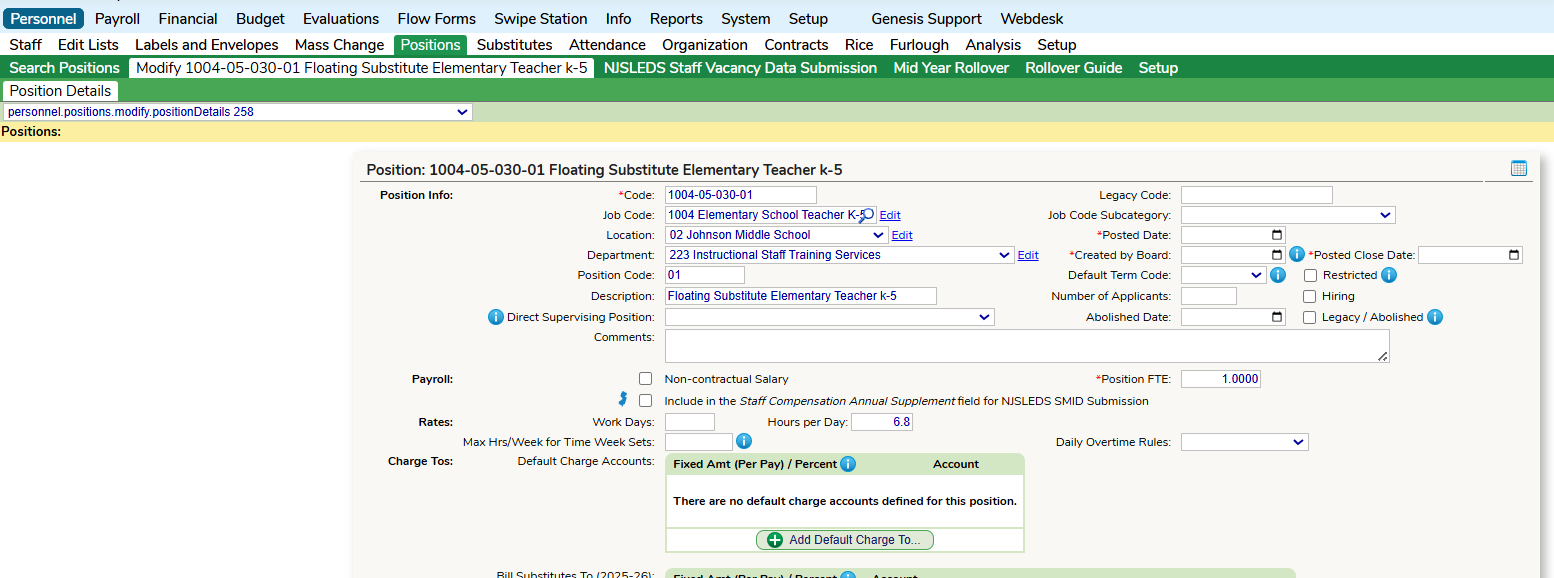
2. Use the "Edit" button for the position within the snapshot. The Modify Position screen will allow you to override how the data will appear when downloading the CSV file for upload.
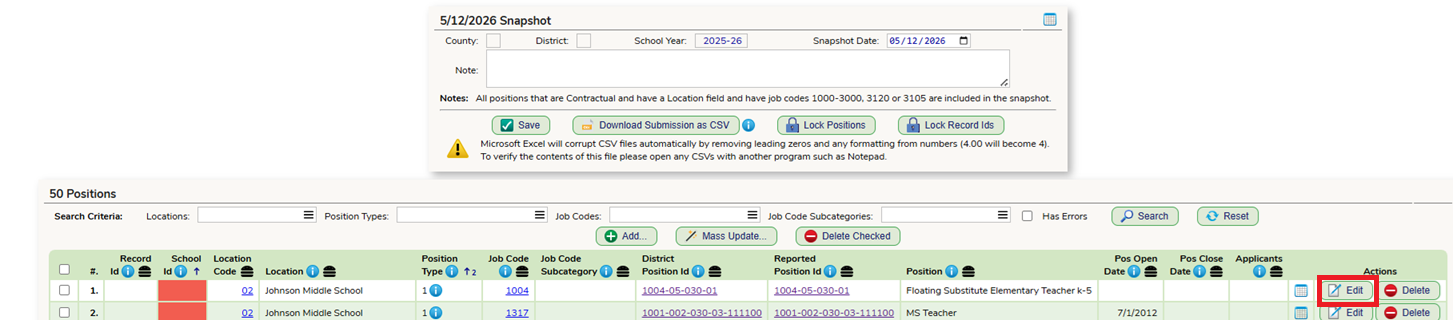
In the notecard where the Positions are displayed, there are some filters that you can use to better review the data. If you need to undo the filters, select "Reset".
The "Add" button will allow you to pull a position into the snapshot. Any added records (even locked) will not carry over to the next snapshot.
The "Mass Update" button will allow you to update the same field for multiple positions at a time. Just check the boxes for the positions you would like to update before selecting.
If you want to remove any listed positions from the snapshot, select "Delete"
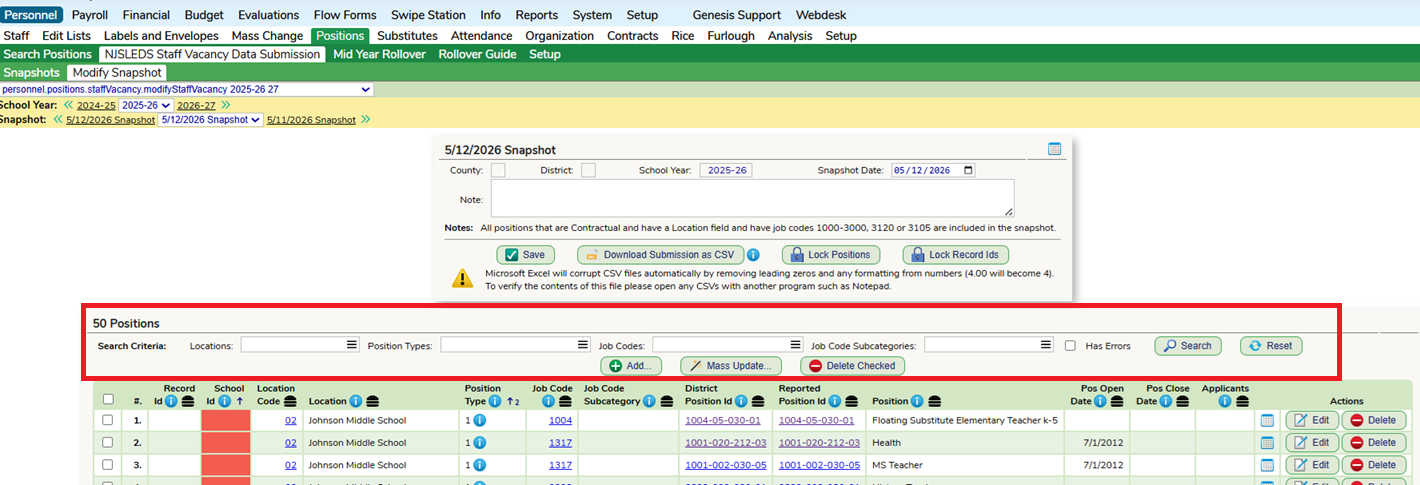
Snapshot Column Breakdown
Record ID
The record ID will be created by the DOE upon submission of a vacancy file. For your first vacancy submission you will most likely not have any Record IDs until you submit a file to the state.
When you receive the Record IDs back please submit a helpdesk ticket with the file for upload.
According to the handbook:
- Districts should reuse the assigned Record ID when submitting updates to an existing vacancy record.
- Record IDs can only be 8 characters long.
- If Record ID is populated, NJSLEDS will treat the submission as an update to an existing Staff Vacancy record.
- If Record ID is blank, NJSLEDS will treat the record as a new Staff Vacancy record and generate a new Record ID.
- Districts must store and reuse the same Record ID any time the exact same vacancy record needs to be corrected or updated.
School ID
This is going to pull the last 3 digits of the CDS Code that is listed on the Locations field that is connected to the Position. To modify this can be done on the Personnel - Setup - Locations screen.


Location Code
The code used on the Personnel - Setup - Locations screen. This code may be different from the "School ID" column. This data is for informational purposes and will not being reported to the state.

Location
This field will pull the Location that is assigned to the Position Code. Locations are managed on the Personnel - Setup - Locations screen.

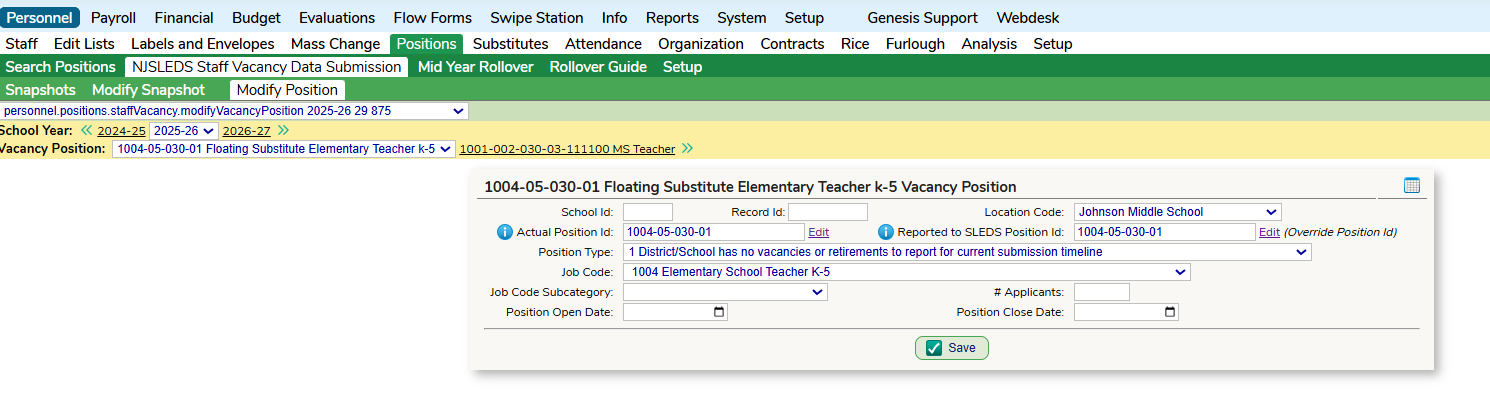
Position Type
Each Position that is brought in will be given a Position Type of 1,3,4 or 5.
1 = No Vacancies or Retirements: There exists Position Tracking record(s) for the selected school year on this Position, and none of the below numbers apply.
- These Position types will not display the Position ID in the CSV file
3 = New Teaching Position: There exists Position Tracking record(s) for the selected school year on this Position, and no tracking records for any previous years.
- These Position Types will require the following columns:
- Job Code
- Job Subcategory
- Position Open Date
- Number of Applicants
4 = Eliminated Position: This position has an Abolished Date that is within the selected school year.
- These Position Types will require the following columns:
- Job Code
- Job Subcategory
- A position will not receive this 'type' unless there is an Abolished date that falls in this school year entered within the Position Code.
- These positions will appear in the snapshot and if the snapshot is export to excel.
5 = Vacant Position: There are no Position Tracking records for the selected school year, or all Position Tracking records for the selected school year do not have staff assigned.
- These Position Types will require the following columns:
- Job Code
- Job Subcategory
- Position Open Date
- Number of Applicants
Job Code
The Job Code field is found on the Position as the Job Code value.

The Job Codes can be managed on the Personnel - Setup - Jobs screen. It is important to note that for this report it will be pulling the code that is on the "State Code" column. It is recommended that the Codes and the description match the State Code that is selected but the report is ultimately looking for the State Code that is connected to the Job Code found within the Position.
The State Code will appear in red if it is not a code that matches one of the valid SLED Codes that are outlined from the state. You will see the Code column highlighted in Yellow if it is a code that does not have a matching/valid State Code.

These State Codes can be found on the state website https://www.nj.gov/education/sleds/keydocs/ outlined under the "Job Codes and Subcategories List".
Job Code Subcategory
This is only mandatory for Position Types 3 - 5. This can be set within the Position Code.
District Position ID
It is recommended to keep accurate Position records. This report will be focusing on the Location and the Job Code. If those fields are not filled in on the Position Code they will not be reported.
If you do not want to update the main Position Record data for this report, please review the Reported Position ID section.

The Position Code will be in red if the code is longer than 20 characters (including dashes).

Reported Position ID
This column is intended for any manual overrides you may have. Using this field allows you to update how the state will be reported of that position ID. This can be useful if you do not want to change the main position code data.
To manually override the Position ID, select the "Edit" button at the end of the row

Position
This is pulling in the the description of the Position Code.

Position Open Date
This is required for Position Types 3 or 5. The field can be entered in the "Created by Board" field found on the Position Code.

Position Close Date
According to the state handbook, a Position Close Date is the "date a position closed". The date must be after the Position Open Date of that same school year. If not, the state will mark it as an error.

To enter a Position Closed Date, on the Position record fill in the "Posted Closed Date" field. If the position type is a 1 (Filled/No Changes), putting a date in this field will make it a 5 (Vacant).

To mark a position as type 4 (Eliminated), you will need to use the "Abolish Date" field. This is the only field that will control if a Position is assigned as a #4. This will pull into the Position Closed Date column on the snapshot.
If the Abolish Date is in a previous school year. It will not be pulled into the report.

NOTE: You cannot have both the "Posted Closed Date" and the "Abolished Date" filled out. If in the case, they are both filled, the Posted Closed Date is what will pull onto the report.
Applicants
Only mandatory for Position Types 3 or 5. This is managed in the "Number of Applicant" field on the Position Code.

Exporting the Data
Opening the file directly from the CSV download will corrupt and reformat the data within. This can result in leading zeros being removed.
To properly submit the CSV file, you will need to download it using the "Download Submission as CSV" and directly upload it to the state.

The recommended way to check the data outside of the system will be to use the Excel download option while you are working on the report.
When you are ready to submit is when you can download the CSV format (do not open the file).
If you want to check how the data in the CSV format, here is how you can do so without corrupting the file:
1. Locate the file in your downloads
2. Select the File
3. Right click on your mouse to select "Open with" from the dropdown and select "Notepad"

This is how the data will appear in the Notepad.

Was this article helpful?
That’s Great!
Thank you for your feedback
Sorry! We couldn't be helpful
Thank you for your feedback
Feedback sent
We appreciate your effort and will try to fix the article